WEB HTML5 DAY03
1 使用结构标记为 HTML文档定义布局
1.1 问题
编写简化版的京东登录页,页面效果如图-1所示。
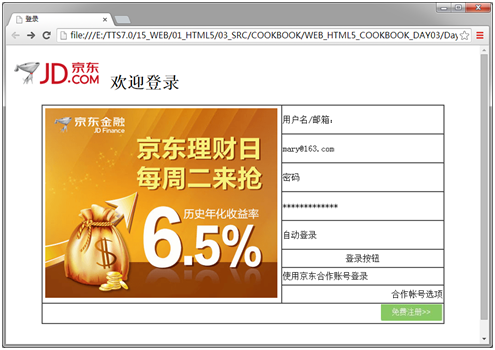
图-1
图中所示页面作为京东登录页的第一版,页面中需要使用表单元素的位置(比如文本框、密码框以及按钮等部分),暂时使用文本替代。
1.2 方案
由图-1可以看出,页面主要分为三个区域:页头部分、主要内容部分和页脚部分。因此,首先需要使用结构标记为页面定义布局。代码如下所示:
<body>
<header></header>
<section></section>
<footer></footer>
</body>
页面的主要内容区域,需要使用表格实现内容的布局。表格结构如图-2所示:
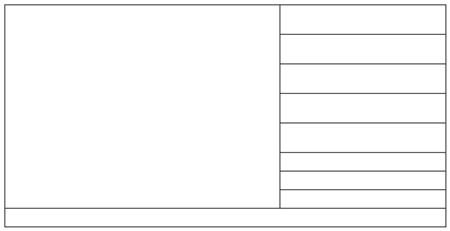
图-2
对于图-2所示的表格,需要设置边框之间的间隔为0。
页脚部分,也需要使用一个一行五列的表格来实现超级链接的布局。
1.3 步骤
实现此案例需要按照如下步骤进行。
步骤一:创建文件
首先创建一个纯文本文件,并修改名称为Day03_jd_login.html;
步骤二:创建 html 文档的结构
使用文本编辑工具,打开上一步中所创建的文件。
在此文件中,添加 HTML 代码,以创建一个标准结构的 HTML 文档,代码如下所示:
<!DOCTYPE HTML>
<html>
<head>
<title>登录</title>
<meta http-equiv="content-type" content="text/html;charset=utf-8" />
<meta name="keywords" content="HTML,CSS,JS" />
</head>
<body>
</body>
</html>
步骤三:使用结构标记为页面定义布局
在<body> 元素中,添加结构标记,为页面定义布局。代码如下所示:
<!DOCTYPE HTML>
<html>
<head>
<title>登录</title>
<meta http-equiv="content-type" content="text/html;charset=utf-8" />
<meta name="keywords" content="HTML,CSS,JS" />
</head>
<body>
#cold_bold<header>
#cold_bold</header>
#cold_bold<section>
#cold_bold</section>
#cold_bold<footer>
#cold_bold</footer>
</body>
</html>
步骤四:定义页头部分
为页头部分添加文本和图像。为实现图中文本的效果,文本需要写在 <h1> 元素中。而为了让图像和文本位于同一行,将图像也写在 <h1> 元素中。代码如下所示:
<!DOCTYPE HTML>
<html>
<head>
<title>登录</title>
<meta http-equiv="content-type" content="text/html;charset=utf-8" />
<meta name="keywords" content="HTML,CSS,JS" />
</head>
<body>
<header>
#cold_bold<h1>
#cold_bold<img src="images/jd_logo.png" />
#cold_bold                欢迎登录
#cold_bold</h1>
</header>
<section>
</section>
<footer>
</footer>
</body>
</html>
步骤五:定义主要内容区域的表格
为主要内容区域,添加表格。
其中,第一行第一列的单元格,需要使用 rowspan 属性设置其跨行,并在该单元格中添加图片;最后一行的单元格,需要使用 colspan 属性设置其跨列,并在该单元格中添加带链接的图片,且设置单元格中的文本居右对齐。
代码如下所示:
<!DOCTYPE HTML>
<html>
<head>
<title>登录</title>
<meta http-equiv="content-type" content="text/html;charset=utf-8" />
<meta name="keywords" content="HTML,CSS,JS" />
</head>
<body>
<header>
<h1>
<img src="images/jd_logo.png" />
                欢迎登录
</h1>
</header>
<section>
#cold_bold<table align="center" border="1" cellspacing="0">
#cold_bold<tr>
#cold_bold<td rowspan="8">
#cold_bold<img src="images/login.png" />
#cold_bold</td>
#cold_bold<td height="50" width="300">用户名/邮箱:</td>
#cold_bold</tr>
#cold_bold<tr>
#cold_bold<td height="50">mary@163.com</td>
#cold_bold</tr>
#cold_bold<tr>
#cold_bold<td height="50">密码</td>
#cold_bold</tr>
#cold_bold<tr>
#cold_bold<td height="50">*************</td>
#cold_bold</tr>
#cold_bold<tr>
#cold_bold<td height="50">
#cold_bold                        自动登录
#cold_bold</td>
#cold_bold</tr>
#cold_bold<tr>
#cold_bold<td height="30" align="center">登录按钮</td>
#cold_bold</tr>
#cold_bold<tr>
#cold_bold<td>使用京东合作账号登录</td>
#cold_bold</tr>
#cold_bold<tr>
#cold_bold<td align="right">合作帐号选项</td>
#cold_bold</tr>
#cold_bold<tr>
#cold_bold<td colspan="2" align="right">
#cold_bold<a href="#"><img src="images/btn_register.jpg" /></a>
#cold_bold</td>
#cold_bold</tr>
#cold_bold</table>
</section>
<footer>
</footer>
</body>
</html>
步骤六:定义页脚区域
为页脚区域添加内容。首先添加表格,然后在单元格中添加文本内容。
代码如下所示:
<!DOCTYPE HTML>
<html>
<head>
<title>登录</title>
<meta http-equiv="content-type" content="text/html;charset=utf-8" />
<meta name="keywords" content="HTML,CSS,JS" />
</head>
<body>
<header>
<h1>
<img src="images/jd_logo.png" />
                欢迎登录
</h1>
</header>
<section>
<table align="center" border="1" cellspacing="0">
<tr>
<td rowspan="8">
<img src="images/login.png" />
</td>
<td height="50" width="300">用户名/邮箱:</td>
</tr>
<tr>
<td height="50">mary@163.com</td>
</tr>
<tr>
<td height="50">密码</td>
</tr>
<tr>
<td height="50">*************</td>
</tr>
<tr>
<td height="50">
                        自动登录
</td>
</tr>
<tr>
<td height="30" align="center">登录按钮</td>
</tr>
<tr>
<td>使用京东合作账号登录</td>
</tr>
<tr>
<td align="right">合作帐号选项</td>
</tr>
<tr>
<td colspan="2" align="right">
<a href="#"><img src="images/btn_register.jpg" /></a>
</td>
</tr>
</table>
</section>
<footer>
#cold_bold<br /><br />
#cold_bold<table align="center">
#cold_bold<tr>
#cold_bold<td>关于我们|</td>
#cold_bold<td>联系我们|</td>
#cold_bold<td>人才招聘|</td>
#cold_bold<td>商家入驻|</td>
#cold_bold<td>广告服务</td>
#cold_bold</tr>
#cold_bold</table>
</footer>
</body>
</html>
1.4 完整代码
本案例的完整代码如下所示:
<!DOCTYPE HTML>
<html>
<head>
<title>登录</title>
<meta http-equiv="content-type" content="text/html;charset=utf-8" />
<meta name="keywords" content="HTML,CSS,JS" />
</head>
<body>
<header>
<h1>
<img src="images/jd_logo.png" />
                欢迎登录
</h1>
</header>
<section>
<table align="center" border="1" cellspacing="0">
<tr>
<td rowspan="8">
<img src="images/login.png" />
</td>
<td height="50" width="300">用户名/邮箱:</td>
</tr>
<tr>
<td height="50">mary@163.com</td>
</tr>
<tr>
<td height="50">密码</td>
</tr>
<tr>
<td height="50">*************</td>
</tr>
<tr>
<td height="50">
                        自动登录
</td>
</tr>
<tr>
<td height="30" align="center">登录按钮</td>
</tr>
<tr>
<td>使用京东合作账号登录</td>
</tr>
<tr>
<td align="right">合作帐号选项</td>
</tr>
<tr>
<td colspan="2" align="right">
<a href="#"><img src="images/btn_register.jpg" /></a>
</td>
</tr>
</table>
</section>
<footer>
<br /><br />
<table align="center">
<tr>
<td>关于我们|</td>
<td>联系我们|</td>
<td>人才招聘|</td>
<td>商家入驻|</td>
<td>广告服务</td>
</tr>
</table>
</footer>
</body>
</html>
2 创建基础表单
2.1 问题
继续修改上一个案例中的 html 文档,为登录页面添加表单元素,页面效果如图-3所示。
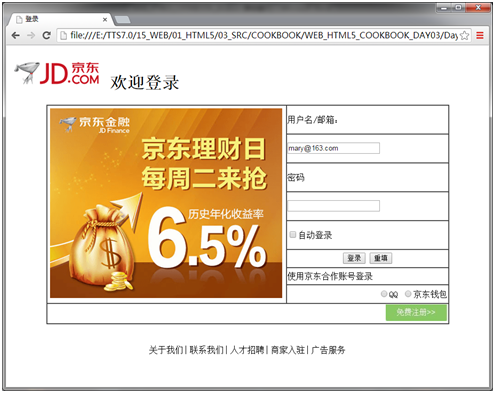
图-3
2.2 方案
分析图-3可以看出,本案例需要在上一个案例的基础上,使用 <inpu> 元素替换原有的部分文本即可。
2.3 步骤
实现此案例需要按照如下步骤进行。
步骤一:创建 <form> 表单
修改上一个案例中的代码,在 <section> 中添加 <form> 元素,包含整个 <table>。修改后的代码如下所示:
<!DOCTYPE HTML>
<html>
<head>
<title>登录</title>
<meta http-equiv="content-type" content="text/html;charset=utf-8" />
<meta name="keywords" content="HTML,CSS,JS" />
</head>
<body>
<header>
<h1>
<img src="images/jd_logo.png" />
                欢迎登录
</h1>
</header>
<section>
#cold_bold<form>
<table align="center" border="1" cellspacing="0">
<!--其他代码,略-->
</table>
#cold_bold</form>
</section>
<footer>
<br /><br />
<table align="center">
<tr>
<td>关于我们|</td>
<td>联系我们|</td>
<td>人才招聘|</td>
<td>商家入驻|</td>
<td>广告服务</td>
</tr>
</table>
</footer>
</body>
</html>
步骤二:定义 <input> 元素
使用 <input> 元素替换页面中的文本。其中,用户名输入使用单行文本框;密码输入使用密码框;“自动”登录选项使用多选框;“登录”和“重填”按钮分别使用提交按钮和重置按钮;“合作账号”选择使用一组单选框。
修改后的代码如下所示:
<!DOCTYPE HTML>
<html>
<head>
<title>登录</title>
<meta http-equiv="content-type" content="text/html;charset=utf-8" />
<meta name="keywords" content="HTML,CSS,JS" />
</head>
<body>
<header>
<h1>
<img src="images/jd_logo.png" />
                欢迎登录
</h1>
</header>
<section>
<form>
<table align="center" border="1" cellspacing="0">
<tr>
<td rowspan="8">
<img src="images/login.png" />
</td>
<td height="50" width="300">用户名/邮箱:</td>
</tr>
<tr>
#cold_bold<td height="50"><input name="username" type="text" value="mary@163.com" /></td>
</tr>
<tr>
<td height="50">密码</td>
</tr>
<tr>
#cold_bold<td height="50"><input name="pwd" type="password" /></td>
</tr>
<tr>
<td height="50">
#cold_bold<input type="checkbox" name="autologin" value="0" />自动登录
</td>
</tr>
<tr>
<td height="30" align="center">
#cold_bold<input type="submit" value="登录" />
#cold_bold<input type="reset" value="重填" />
</td>
</tr>
<tr>
<td>使用京东合作账号登录</td>
</tr>
<tr>
<td align="right">
#cold_bold<input type="radio" name="rdOther" value="0" />QQ
#cold_bold<input type="radio" name="rdOther" value="1" />京东钱包
</td>
</tr>
<tr>
<td colspan="2" align="right">
<a href="#"><img src="images/btn_register.jpg" /></a>
</td>
</tr>
</table>
</form>
</section>
<footer>
<br /><br />
<table align="center">
<tr>
<td>关于我们|</td>
<td>联系我们|</td>
<td>人才招聘|</td>
<td>商家入驻|</td>
<td>广告服务</td>
</tr>
</table>
</footer>
</body>
</html>
2.4 完整代码
本案例的完整代码如下所示:
<!DOCTYPE HTML>
<html>
<head>
<title>登录</title>
<meta http-equiv="content-type" content="text/html;charset=utf-8" />
<meta name="keywords" content="HTML,CSS,JS" />
</head>
<body>
<header>
<h1>
<img src="images/jd_logo.png" />
                欢迎登录
</h1>
</header>
<section>
<form>
<table align="center" border="1" cellspacing="0">
<tr>
<td rowspan="8">
<img src="images/login.png" />
</td>
<td height="50" width="300">用户名/邮箱:</td>
</tr>
<tr>
<td height="50"><input name="username" type="text" value="mary@163.com" /></td>
</tr>
<tr>
<td height="50">密码</td>
</tr>
<tr>
<td height="50"><input name="pwd" type="password" /></td>
</tr>
<tr>
<td height="50">
<input type="checkbox" name="autologin" value="0" />自动登录
</td>
</tr>
<tr>
<td height="30" align="center">
<input type="submit" value="登录" />
<input type="reset" value="重填" />
</td>
</tr>
<tr>
<td>使用京东合作账号登录</td>
</tr>
<tr>
<td align="right">
<input type="radio" name="rdOther" value="0" />QQ
<input type="radio" name="rdOther" value="1" />京东钱包
</td>
</tr>
<tr>
<td colspan="2" align="right">
<a href="#"><img src="images/btn_register.jpg" /></a>
</td>
</tr>
</table>
</form>
</section>
<footer>
<br /><br />
<table align="center">
<tr>
<td>关于我们|</td>
<td>联系我们|</td>
<td>人才招聘|</td>
<td>商家入驻|</td>
<td>广告服务</td>
</tr>
</table>
</footer>
</body>
</html>
3 创建复杂表单_1
3.1 问题
创建复杂表单,实现如图-4所示的页面效果:
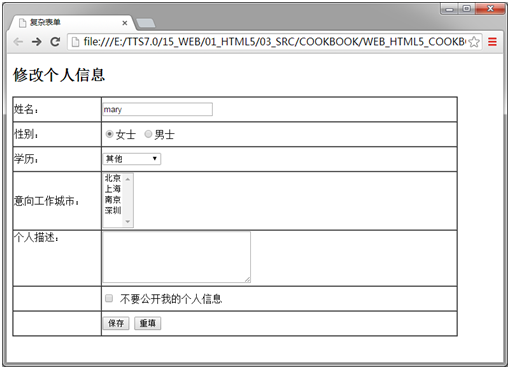
图-4
其中,对于页面上的单选框和复选框,需要做到,单击选择框后面的文本,就象单击选择框一样。比如,单击“不要公开我的个人信息”文本,则可以实现对该文本前面的选择框的选中或者取消选中。另外,页面上的列表框,需要能够实现多选。
3.2 方案
首先使用表格实现图-4所示的页面布局,表格布局形如图-5所示:
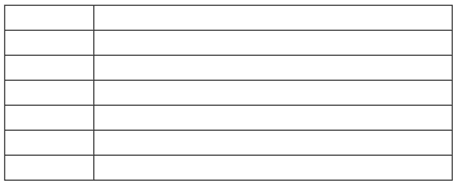
图-5
图-5所示的表格中,第一列用于显示文本信息,如“姓名”、“性别”等;第二列用于显示文本框、选择框等。
如果需要实现列表框的多选,需要为<select> 元素定义 multiple 属性,代码如下:
<select size="5" name="sel2" multiple>
</select>
如果需要实现单击选择框后面的文本,就象单击选择框一样,需要使用 <label> 元素。代码如下所示:
<input type="checkbox" id="chkPublic" name="chkHide" />
<label for="chkPublic">不要公开我的个人信息</label>
3.3 步骤
实现此案例需要按照如下步骤进行。
步骤一:创建文件
首先创建一个纯文本文件,并修改名称为Day03_form.html;然后使用文本编辑工具,打开所创建的文件。
在此文件中,添加 HTML 代码,以创建一个标准结构的 HTML 文档。在 <body> 元素中使用 <h2> 元素定义文本标题,并添加 <form> 元素。代码如下所示:
<!DOCTYPE HTML>
<html>
<head>
<title>复杂表单</title>
<meta http-equiv="content-type" content="text/html;charset=utf-8" />
</head>
<body>
<h2>修改个人信息</h2>
<form>
</form>
</body>
</html>
步骤二:定义页面布局
在 <form> 元素中添加代码,创建布局用的表格。代码如下所示:
<!DOCTYPE HTML>
<html>
<head>
<title>复杂表单</title>
<meta http-equiv="content-type" content="text/html;charset=utf-8" />
</head>
<body>
<h2>修改个人信息</h2>
<form>
#cold_bold<table width="700" border="1" cellspacing="0">
#cold_bold</table>
</form>
</body>
步骤三:创建表格的第一行
为表格创建第一行的内容:修改姓名的行。定义两个单元格,并分别创建单元格中的内容。其中,文本框使用 <input> 元素创建,并使用 value 属性设置文本框中的初始值。代码如下所示:
<!--其他部分代码,略-->
<table width="700" border="1" cellspacing="0">
#cold_bold<tr>
#cold_bold<td width="20%" height="35"> 姓名:</td>
#cold_bold<td  width="350">
#cold_bold<input type="text" value="mary" name="username" />
#cold_bold</td>
#cold_bold</tr>
</table>
<!--其他部分代码,略-->
步骤四:创建表格的第二行
为表格创建第二行的内容:修改性别选项的行。定义两个单元格,并分别创建单元格中的内容。其中,需要使用 <lable> 元素定义文本并和单选框关联。代码如下所示:
<!--其他部分代码,略-->
<table width="700" border="1" cellspacing="0">
<tr>
<td width="20%" height="35"> 姓名:</td>
<td  width="350">
<input type="text" value="mary" name="username" />
</td>
</tr>
#cold_bold<tr>
#cold_bold<td height="35">性别:</td>
#cold_bold<td>
#cold_bold<input type="radio" id="rexFemal" name="sex" checked value="0" /><label for="rexFemal">女士</label>
#cold_bold<input type="radio" id="rexMal" name="sex" value="1" /><label for="rexMal">男士</label>
#cold_bold</td>
#cold_bold</tr>
</table>
<!--其他部分代码,略-->
步骤五:创建表格的第三行
为表格创建第三行的内容:选择学历的行。其中,下拉选择框使用 <select> 元素创建,代码如下所示:
<!--其他部分代码,略-->
<table width="700" border="1" cellspacing="0">
<tr>
<td width="20%" height="35"> 姓名:</td>
<td  width="350">
<input type="text" value="mary" name="username" />
</td>
</tr>
<tr>
<td height="35">性别:</td>
<td>
<input type="radio" id="rexFemal" name="sex" checked value="0" /><label for="rexFemal">女士</label>
<input type="radio" id="rexMal" name="sex" value="1" /><label for="rexMal">男士</label>
</td>
</tr>
#cold_bold<tr>
#cold_bold<td height="35">学历:</td>
#cold_bold<td>
#cold_bold<select name="sel1">
#cold_bold<option value="1">其他</option>
#cold_bold<option value="2">专科</option>
#cold_bold<option value="3">本科</option>
#cold_bold<option value="4">硕士及以上</option>
#cold_bold</select>
#cold_bold</td>
#cold_bold</tr>
</table>
<!--其他部分代码,略-->
步骤六:创建表格的第四行
为表格创建第四行的内容:选择意向工作城市的行。代码如下所示:
<!--其他部分代码,略-->
<table width="700" border="1" cellspacing="0">
<tr>
<td width="20%" height="35"> 姓名:</td>
<td  width="350">
<input type="text" value="mary" name="username" />
</td>
</tr>
<tr>
<td height="35">性别:</td>
<td>
<input type="radio" id="rexFemal" name="sex" checked value="0" /><label for="rexFemal">女士</label>
<input type="radio" id="rexMal" name="sex" value="1" /><label for="rexMal">男士</label>
</td>
</tr>
<tr>
<td height="35">学历:</td>
<td>
<select name="sel1">
<option value="1">其他</option>
<option value="2">专科</option>
<option value="3">本科</option>
<option value="4">硕士及以上</option>
</select>
</td>
</tr>
#cold_bold<tr>
#cold_bold<td height="35">意向工作城市:</td>
#cold_bold<td>
#cold_bold<select size="5" name="sel2" multiple>
#cold_bold<option value="1">北京</option>
#cold_bold<option value="2">上海</option>
#cold_bold<option value="3">南京</option>
#cold_bold<option value="4">深圳</option>
#cold_bold</select>
#cold_bold</td>
#cold_bold</tr>
</table>
<!--其他部分代码,略-->
步骤七:创建表格的第五行
为表格创建第五行的内容:录入个人描述的行。其中,多行文本框使用 <textarea> 元素创建,并通过 cols 和 rows 属性设置大小。代码如下所示:
<!--其他部分代码,略-->
<table width="700" border="1" cellspacing="0">
<tr>
<td width="20%" height="35"> 姓名:</td>
<td  width="350">
<input type="text" value="mary" name="username" />
</td>
</tr>
<tr>
<td height="35">性别:</td>
<td>
<input type="radio" id="rexFemal" name="sex" checked value="0" /><label for="rexFemal">女士</label>
<input type="radio" id="rexMal" name="sex" value="1" /><label for="rexMal">男士</label>
</td>
</tr>
<tr>
<td height="35">学历:</td>
<td>
<select name="sel1">
<option value="1">其他</option>
<option value="2">专科</option>
<option value="3">本科</option>
<option value="4">硕士及以上</option>
</select>
</td>
</tr>
<tr>
<td height="35">意向工作城市:</td>
<td>
<select size="5" name="sel2" multiple>
<option value="1">北京</option>
<option value="2">上海</option>
<option value="3">南京</option>
<option value="4">深圳</option>
</select>
</td>
</tr>
#cold_bold<tr>
#cold_bold<td valign="top">个人描述:</td>
#cold_bold<td>
#cold_bold<textarea cols="30" rows="5" name="description"></textarea>
#cold_bold</td>
#cold_bold</tr>
</table>
<!--其他部分代码,略-->
步骤八:创建表格的第六行
为表格创建第六行的内容。注意,需要使用 <label> 元素定义文本,以实现和复选框的关联。代码如下所示:
<!--其他部分代码,略-->
<table width="700" border="1" cellspacing="0">
<tr>
<td width="20%" height="35"> 姓名:</td>
<td  width="350">
<input type="text" value="mary" name="username" />
</td>
</tr>
<tr>
<td height="35">性别:</td>
<td>
<input type="radio" id="rexFemal" name="sex" checked value="0" /><label for="rexFemal">女士</label>
<input type="radio" id="rexMal" name="sex" value="1" /><label for="rexMal">男士</label>
</td>
</tr>
<tr>
<td height="35">学历:</td>
<td>
<select name="sel1">
<option value="1">其他</option>
<option value="2">专科</option>
<option value="3">本科</option>
<option value="4">硕士及以上</option>
</select>
</td>
</tr>
<tr>
<td height="35">意向工作城市:</td>
<td>
<select size="5" name="sel2" multiple>
<option value="1">北京</option>
<option value="2">上海</option>
<option value="3">南京</option>
<option value="4">深圳</option>
</select>
</td>
</tr>
<tr>
<td valign="top">个人描述:</td>
<td>
<textarea cols="30" rows="5" name="description"></textarea>
</td>
</tr>
#cold_bold<tr>
#cold_bold<td height="35"></td>
#cold_bold<td>
#cold_bold<input type="checkbox" id="chkPublic" name="chkHide" />
#cold_bold<label for="chkPublic">不要公开我的个人信息</label>
#cold_bold</td>
#cold_bold</tr>
</table>
<!--其他部分代码,略-->
步骤九:创建表格的第七行
为表格创建第七行的内容:操作按钮的行。其中,保存按钮使用 <input> 元素创建,并设置 type 属性为 submit;重填按钮使用 <input> 元素创建,并设置 type 属性为 reset。代码如下所示:
<!--其他部分代码,略-->
<table width="700" border="1" cellspacing="0">
<tr>
<td width="20%" height="35"> 姓名:</td>
<td  width="350">
<input type="text" value="mary" name="username" />
</td>
</tr>
<tr>
<td height="35">性别:</td>
<td>
<input type="radio" id="rexFemal" name="sex" checked value="0" /><label for="rexFemal">女士</label>
<input type="radio" id="rexMal" name="sex" value="1" /><label for="rexMal">男士</label>
</td>
</tr>
<tr>
<td height="35">学历:</td>
<td>
<select name="sel1">
<option value="1">其他</option>
<option value="2">专科</option>
<option value="3">本科</option>
<option value="4">硕士及以上</option>
</select>
</td>
</tr>
<tr>
<td height="35">意向工作城市:</td>
<td>
<select size="5" name="sel2" multiple>
<option value="1">北京</option>
<option value="2">上海</option>
<option value="3">南京</option>
<option value="4">深圳</option>
</select>
</td>
</tr>
<tr>
<td valign="top">个人描述:</td>
<td>
<textarea cols="30" rows="5" name="description"></textarea>
</td>
</tr>
<tr>
<td height="35"></td>
<td>
<input type="checkbox" id="chkPublic" name="chkHide" />
<label for="chkPublic">不要公开我的个人信息</label>
</td>
</tr>
#cold_bold<tr>
#cold_bold<td height="35"></td>
#cold_bold<td>
#cold_bold<input type="submit" value="保存" />
#cold_bold<input type="reset" value="重填" />
#cold_bold</td>
#cold_bold</tr>
</table>
<!--其他部分代码,略-->
3.4 完整代码
本案例的完整代码如下所示:
<!DOCTYPE HTML>
<html>
<head>
<title>复杂表单</title>
<meta http-equiv="content-type" content="text/html;charset=utf-8" />
</head>
<body>
<h2>修改个人信息</h2>
<form>
<table width="700" border="1" cellspacing="0">
<tr>
<td width="20%" height="35"> 姓名:</td>
<td  width="350">
<input type="text" value="mary" name="username" />
</td>
</tr>
<tr>
<td height="35">性别:</td>
<td>
<input type="radio" id="rexFemal" name="sex" checked value="0" /><label for="rexFemal">女士</label>
<input type="radio" id="rexMal" name="sex" value="1" /><label for="rexMal">男士</label>
</td>
</tr>
<tr>
<td height="35">学历:</td>
<td>
<select name="sel1">
<option value="1">其他</option>
<option value="2">专科</option>
<option value="3">本科</option>
<option value="4">硕士及以上</option>
</select>
</td>
</tr>
<tr>
<td height="35">意向工作城市:</td>
<td>
<select size="5" name="sel2" multiple>
<option value="1">北京</option>
<option value="2">上海</option>
<option value="3">南京</option>
<option value="4">深圳</option>
</select>
</td>
</tr>
<tr>
<td valign="top">个人描述:</td>
<td>
<textarea cols="30" rows="5" name="description"></textarea>
</td>
</tr>
<tr>
<td height="35"></td>
<td>
<input type="checkbox" id="chkPublic" name="chkHide" />
<label for="chkPublic">不要公开我的个人信息</label>
</td>
</tr>
<tr>
<td height="35"></td>
<td>
<input type="submit" value="保存" />
<input type="reset" value="重填" />
</td>
</tr>
</table>
</form>
</body>
</html>
4 创建复杂表单_2
4.1 问题
修改上一个案例中所创建的复杂表单,实现如图-6所示的页面效果:
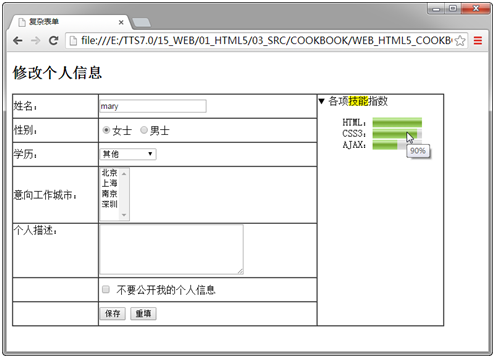
图-6
其中,“各项技能指数”部分可以展开或者收起;鼠标移入“HTML”、“CSS3”和“AJAX”指示条时,提示信息分别为100%、90%和50%。
4.2 方案
首先需要修改页面布局所用的表格,为第一行添加一个单元格,且需要使用 rowspan 属性设置其跨行。
其次,需要使用 <details> 和 <summary> 元素为页面添加摘要和细节;指示条部分需要使用 <meter> 元素创建。
4.3 步骤
实现此案例需要按照如下步骤进行。
步骤一:修改布局用的表格
修改布局用的表格,为第一行添加一个单元格,且设置单元格中的内容在垂直方向上居顶端对齐。
修改后的表格代码如下所示:
<!--其他代码,略-->
<table width="700" border="1" cellspacing="0">
<tr>
<td width="20%" height="35"> 姓名:</td>
<td width="350">
<input type="text" value="mary" name="username" />
</td>
#cold_bold<td rowspan="7" valign="top">
#cold_bold</td>
</tr>
<!--其他表行的代码,略-->
</table>
<!--其他代码,略-->
步骤二:创建摘要和细节
在新添加的单元格中创建摘要和细节,并定义度量元素。
代码如下所示:
<!--其他代码,略-->
<table width="700" border="1" cellspacing="0">
<tr>
<td width="20%" height="35"> 姓名:</td>
<td width="350">
<input type="text" value="mary" name="username" />
</td>
<td rowspan="7" valign="top">
#cold_bold<details>
#cold_bold<summary>各项<mark>技能</mark>指数</summary>
#cold_bold<ul type="none">
#cold_bold<li>HTML:<meter max="100" min="0" value="100" title="100%"></meter></li>
#cold_bold<li>CSS3:<meter max="100" min="0" value="90" title="90%"></meter></li>
#cold_bold<li>AJAX:<meter max="100" min="0" value="50" title="50%"></meter></li>
#cold_bold</ul>
#cold_bold</details>
</td>
</tr>
<!--其他表行的代码,略-->
</table>
<!--其他代码,略-->
4.4 完整代码
本案例的完整代码如下所示:
<!DOCTYPE HTML>
<html>
<head>
<title>复杂表单</title>
<meta http-equiv="content-type" content="text/html;charset=utf-8" />
</head>
<body>
<h2>修改个人信息</h2>
<form>
<table width="700" border="1" cellspacing="0">
<tr>
<td width="20%" height="35"> 姓名:</td>
<td width="350">
<input type="text" value="mary" name="username" />
</td>
<td rowspan="7" valign="top">
<details>
<summary>各项<mark>技能</mark>指数</summary>
<ul type="none">
<li>HTML:<meter max="100" min="0" value="100" title="100%"></meter></li>
<li>CSS3:<meter max="100" min="0" value="90" title="90%"></meter></li>
<li>AJAX:<meter max="100" min="0" value="50" title="50%"></meter></li>
</ul>
</details>
</td>
</tr>
<tr>
<td height="35">性别:</td>
<td>
<input type="radio" id="rexFemal" name="sex" checked value="0" /><label for="rexFemal">女士</label>
<input type="radio" id="rexMal" name="sex" value="1" /><label for="rexMal">男士</label>
</td>
</tr>
<tr>
<td height="35">学历:</td>
<td>
<select name="sel1">
<option value="1">其他</option>
<option value="2">专科</option>
<option value="3">本科</option>
<option value="4">硕士及以上</option>
</select>
</td>
</tr>
<tr>
<td height="35">意向工作城市:</td>
<td>
<select size="5" name="sel2" multiple>
<option value="1">北京</option>
<option value="2">上海</option>
<option value="3">南京</option>
<option value="4">深圳</option>
</select>
</td>
</tr>
<tr>
<td valign="top">个人描述:</td>
<td>
<textarea cols="30" rows="5" name="description"></textarea>
</td>
</tr>
<tr>
<td height="35"></td>
<td>
<input type="checkbox" id="chkPublic" name="chkHide" />
<label for="chkPublic">不要公开我的个人信息</label>
</td>
</tr>
<tr>
<td height="35"></td>
<td>
<input type="submit" value="保存" />
<input type="reset" value="重填" />
</td>
</tr>
</table>
</form>
</body>
</html>